프로젝트 생성 및 초기 세팅
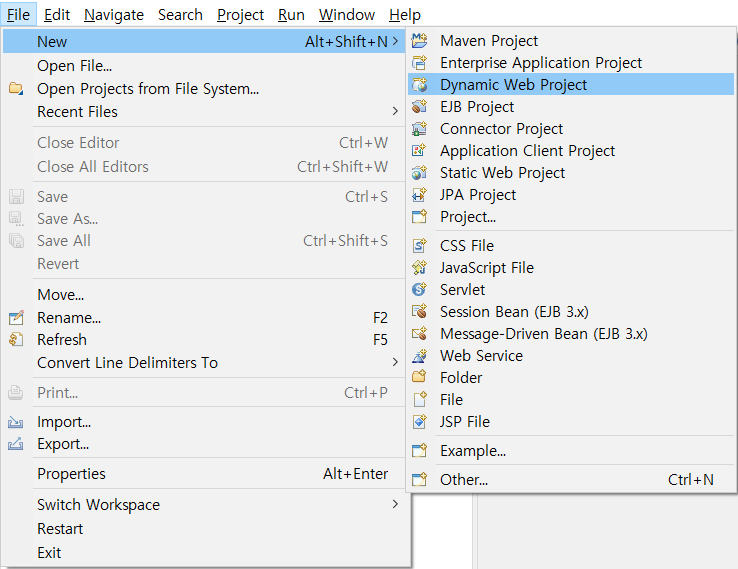
Dyamic Web Project를 생성해줍니다.
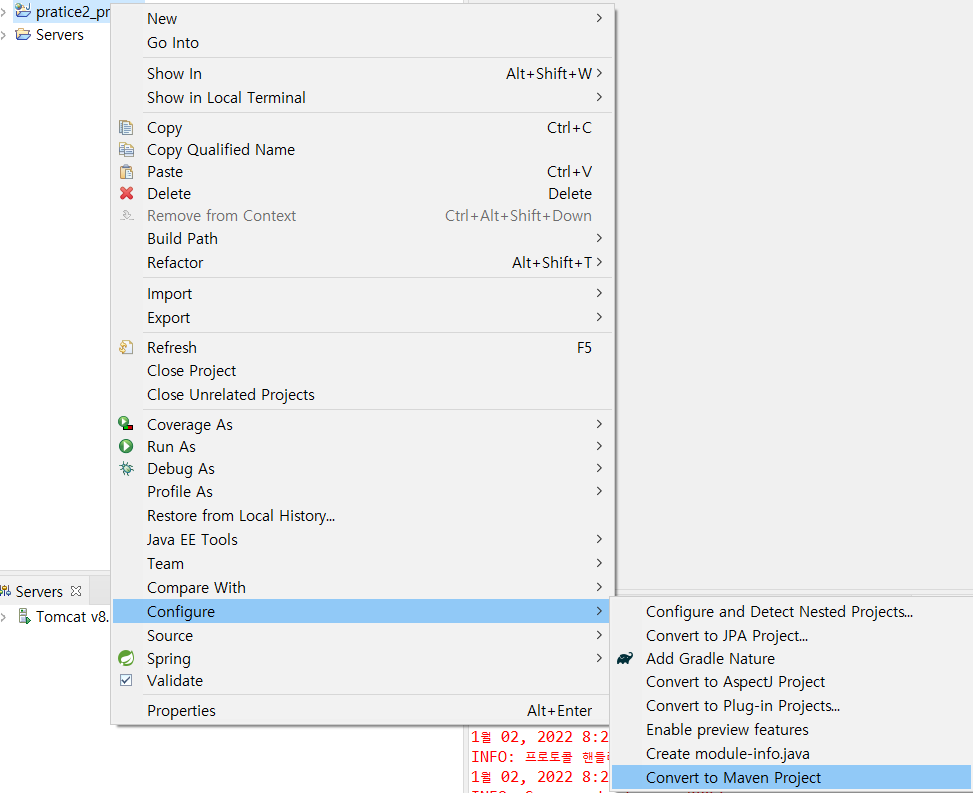
프로젝트 마우스 우클릭 -> Configure -> Convert to Maven Project 하여 Maven Project로 변경합니다.
이클립스에 톰캣을 추가합니다. (생략)
프로젝트 마우스 우클릭 -> Properties -> Project Facets에서 Dynamic Web Module을 3.0으로 변경하고,
Rumtimes에서 이전에 추가한 톰캣을 선택하여 적용합니다.
그리고 톰캣을 실행 할 JDK버전에 맞추어 프로젝트 Java 버전도 변경해 줍니다.

pom.xml에 라이브러리를 추가해주어야 합니다.
기본적으로 Maven Repository 사이트를 통해 JSP, JSTL, Spring MVC, Servlet을 추가했습니다.
	<dependencies>
		<!-- https://mvnrepository.com/artifact/javax.servlet.jsp/javax.servlet.jsp-api -->
		<dependency>
			<groupId>javax.servlet.jsp</groupId>
			<artifactId>javax.servlet.jsp-api</artifactId>
			<version>2.3.3</version>
			<scope>provided</scope>
		</dependency>
		<!-- https://mvnrepository.com/artifact/javax.servlet.jsp.jstl/jstl -->
		<dependency>
			<groupId>javax.servlet.jsp.jstl</groupId>
			<artifactId>jstl-api</artifactId>
			<version>1.2</version>
		</dependency>
		<!-- https://mvnrepository.com/artifact/org.springframework/spring-webmvc -->
		<dependency>
			<groupId>org.springframework</groupId>
			<artifactId>spring-webmvc</artifactId>
			<version>5.3.14</version>
		</dependency>
		<!-- https://mvnrepository.com/artifact/javax.servlet/javax.servlet-api -->
		<dependency>
			<groupId>javax.servlet</groupId>
			<artifactId>javax.servlet-api</artifactId>
			<version>3.1.0</version>
			<scope>provided</scope>
		</dependency>
	</dependencies>
web.xml 세팅
web.xml은 실행되어지는 servlet의 설정을 위한 것이며, 프로젝트의 web.xml이 없다면 Servers(톰캣)의 web.xml을 적용합니다.
그리고 프로젝트의 web.xml에서 설정한 것 이외의 필요한 부분들은 Servers의 web.xml의 것을 가져오게 됩니다.
우선, webapp 혹은 WebContent 아래에 web.xml 파일을 만들어 줍니다.
그 이유는 WebContent 파일들은 웹 브라우저가 파일 이름이나 경로만 알면 직접 주소를 검색하여 들어가서 요청을 할 수 있지만, WEB-INF는 그렇지 못하기 때문입니다.
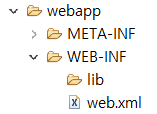
그다음 Servers의 web.xml에서 프로젝트 세팅이 필요한 정보를 프로젝트 web.xml에 가져올 것입니다.
먼저, <web-app>을 가져와서 붙여 넣기 합니다.

Servers의 web.xml에서 <servlet-mapping>과 <servlet>을 가져와 붙여넣기 합니다.

그리고 이 것의 내용을 변경해 줍니다.

현재 웹 애플리케이션에서 받아들이는 모든 요청에 대해 appServlet이라는 이름으로 되어있는 서블릿을 사용하겠다는 뜻이며, appServlet은 Spring MVC에서 제공하고 있는 기본 서블릿을 지정했습니다.
테스트를 위해 webapp 혹은 WebContent폴더 바로 아래에 index.jsp를 만들어 프로젝트를 실행시켜 봅니다.

실행 결과는 잘 나오지만 Console창에 에러가 발생하는 것을 확인할 수 있습니다.

프로그래밍에서 context는 어떠한 작업을 하기 위해서 필요한 정보를 가리킨다는 뜻이고,
ServletContext는 Servlet을 운영하기 위해 정보를 가지고 있는 Context입니다.
오류에서 [서블릿 이름]-servlet으로 파일을 찾게 되는데, 이 파일은 Spring MVC프로그램을 전체적으로 설정하는 파일이 됩니다.
실제로 <servlet-name>을 appServlet이 아닌 aaaa로 바꾼다면, 오류 내용도 바뀔 것입니다.

Context파일 및 필터 설정
web.xml의 <servlet>에 다음과 같이 코드를 추가합니다.


<init-param>의 contextConfigLocation은 Spring MVC의 DispatcherServlet에 있는 contextConfigLocation에 파라미터로 servlet-context.xml과 root-context.xml을 지정하겠다는 뜻입니다.
servlet-context.xml은 DispatcherServlet과 관련된 내용을 추가할 것이고, root-context.xml에는 bean을 정의하는 파일들과 관련된 코드를 추가할 것입니다.
위의 코드의 경로와 같이 WEB-INF아래에 config폴더와 xml파일들을 만들어 줍니다.
(여기서 xml파일을 만들어도 되지만, 저는 설정을 간편하게 하기 위해 Spring Bean Configuration File을 이용해 만들었습니다.)


Spring Bean Configuration File을 이용해서 만들면 하단의 Namespaces를 이용해 간단하게 설정이 가능합니다.
Servlet-context.xml
<?xml version="1.0" encoding="UTF-8"?>
<beans:beans xmlns="http://www.springframework.org/schema/mvc"
	xmlns:xsi="http://www.w3.org/2001/XMLSchema-instance"
	xmlns:beans="http://www.springframework.org/schema/beans"
	xmlns:context="http://www.springframework.org/schema/context"
	xsi:schemaLocation="http://www.springframework.org/schema/mvc http://www.springframework.org/schema/mvc/spring-mvc-4.3.xsd
		http://www.springframework.org/schema/beans http://www.springframework.org/schema/beans/spring-beans-4.3.xsd
		http://www.springframework.org/schema/context http://www.springframework.org/schema/context/spring-context-4.3.xsd">


		<annotation-driven />

		<context:component-scan base-package="kr.co.softcampus.controller" />

		<beans:bean class="org.springframework.web.servlet.view.InternalResourceViewResolver">
			<beans:property name="prefix" value="/WEB-INF/views/" />
			<beans:property name="suffix" value=".jsp" />
		</beans:bean>

		<resources location="/resources/" mapping="/**" />
</beans:beans>
<beans:beans> 같은 경우에 Namespaces를 이용하면 쉽게 설정이 가능합니다.
<annotation-driven>은 스캔할 패키지 내부의 클래스 중 Controller 어노테이션을 가지고 있는 클래스들을 Controller로 로딩하도록 합니다.
<context:componenet-scan>은 스캔할 bean들이 모여있는 패키지를 지정합니다.
<beans:bean>을 이용하여 Controller의 메서드에서 반환하는 문자열 앞 뒤에 붙일 경로 정보를 세팅합니다.
예를 들어 Controller 파일에서 /WEB-INF/views/ 에 있는 index.jsp 파일을 보여주고 싶다면
return "/WEB-INF/views/index.jsp"라고 해야 하지만 위의 ViewResolver처럼 설정한다면
return "index"만 해주면 됩니다.
<resources>는 정적 파일 경로를 세팅합니다.
root-context.xml
<?xml version="1.0" encoding="UTF-8"?>
<beans xmlns="http://www.springframework.org/schema/beans"
	xmlns:xsi="http://www.w3.org/2001/XMLSchema-instance"
	xsi:schemaLocation="http://www.springframework.org/schema/beans
						http://www.springframework.org/schema/beans/spring-beans.xsd">

</beans>
이 파일도 또한 Namespaces를 이용하여 쉽게 세팅을 하며, 우리의 필요에 의해 만들 bean들을 이곳에 추가해 주어야 합니다.
마무리
경로에 맞게 화면이 잘 나오는지 확인하기 위하여 src에 Controller 파일을 만들어 줍니다.
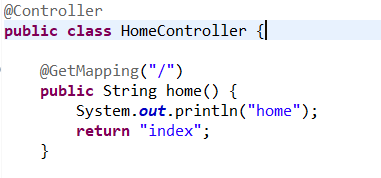
servlet-context.xml에서 설정한 ViewResolver에 따라 WEB-INF에 views라는 폴더를 만들고, 그 안에 index.jsp를 생성해 줍니다.
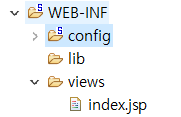
그리고 실행을 하면 결과는 잘 나오는 것을 확인할 수 있습니다.

출처
https://www.inflearn.com/course/spring-mvc5-project/dashboard
'Spring' 카테고리의 다른 글
| [Spring] 프록시 패턴, 데코레이션 패턴 (0) | 2022.08.29 |
|---|---|
| [SpringBoot] 컴포넌트스캔 (0) | 2022.08.29 |
| [Spring] Missing artifact javax.servlet.jsp.jstl:jstl:jar:1.2 오류 (0) | 2022.01.02 |
| @PostConstruct, @PreDestroy (0) | 2021.10.29 |
| Lombok 어노테이션 (0) | 2020.12.27 |

