게시판을 이용할 때 글씨에 색을 변경하고 이미지도 업로드하여 게시글을 작성합니다.
이것을 위지윅 에디터(WYSIWYG Editor)라고 하는데, 저는 무료 위지윅 에디터인 CKEditor를 이용하여 Spring Boot에 이미지 업로드를 구현해보겠습니다.
1. CKEditor Download
아래의 경로에서 CKEditor를 다운로드합니다.
https://ckeditor.com/ckeditor-4/
CKEditor 4 | Visual Text Editor for HTML
Fully Customizable WYSIWYG HTML Editor with the biggest number of Rich Text features. Enterprise-grade with 70 languages and the approval of millions.
ckeditor.com
현재 CKEditor5까지 나왔지만 저는 4버전을 사용할 것입니다.
버전은 Basic Package, Standard Package, Full Package, Customize 등 선택할 수 있지만 기능이 많은 Full Package를 zip파일로 다운로드 받아줍니다.

다운로드가 완료되면 ckeditor라는 폴더가 생성 될 것입니다.
2. CKEditor 적용

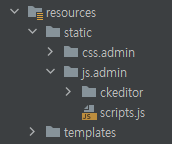
Spring Boot의 resources/static 아래의 경로로 ckeditor폴더를 복사/붙여넣기 합니다.
저는 resources/static/js/admin 아래에 붙여넣기를 했습니다.
<form th:action="@{/admin/post/new}" th:object="${postForm}" method="post">
	<textarea name="contents" class="form-control" id="contents" th:field="*{content}"></textarea>
	<script>
		var ckeditor_config = {
			filebrowserUploadMethod :'form',
			filebrowserUploadUrl: "/admin/post/imageUpload",
			extraPlugins : 'autogrow',
           	 };

        CKEDITOR.replace("contents", ckeditor_config);
	</script>
        <button class="btn btn-primary">저장</button>
</form>
CKEditor는 위의 코드에 textarea 태그에 적용시킬 것입니다.
name을 지정하고(contents) 이것을 CKEDITOR.replace에 넣어줍니다.
그리고 body 내부에 <script>를 생성하여 ckeditor_config를 작성합니다.
filebrowserUploadMethod : 'form'
CKEditor 4.9 부터 모든 파일 업로드는 JSON응답을 해야하는데 저는 그렇지 않을 것이기 때문에 form으로 바꾸어줍니다.
filebrowserUploadUrl
이미지를 서버에 전송을 할 때 이용되는 URL입니다.
extraPlugins
글이 길어질 때 CKEditor창이 자동으로 늘어나는 플러그인 설정입니다.

ckeditor_config 설정을 완료한 뒤 이미지 전송 창입니다.
'서버로 전송'을 누르면 위에서 설정한 /admin/post/imgUpload URL로 이미지가 전송하게 됩니다.
3. Contoller 작성
@Value("${image.upload.path}")
private String uploadPath;

@Value("${resource.handler}")
private String resourceHandler;


@PostMapping("/admin/post/imageUpload")
    public void postImage(MultipartFile upload, HttpServletResponse res, HttpServletRequest req){

        OutputStream out = null;
        PrintWriter printWriter = null;

        res.setCharacterEncoding("utf-8");
        res.setContentType("text/html;charset=utf-8");

        try{

            UUID uuid = UUID.randomUUID();
            String extension = FilenameUtils.getExtension(upload.getOriginalFilename());

            byte[] bytes = upload.getBytes();

            // 실제 이미지 저장 경로
            String imgUploadPath = uploadPath + File.separator + uuid + "." + extension;

            // 이미지 저장
            out = new FileOutputStream(imgUploadPath);
            out.write(bytes);
            out.flush();

            // ckEditor 로 전송
            printWriter = res.getWriter();
            String callback = req.getParameter("CKEditorFuncNum");
            String fileUrl = "/admin/post/image/" + uuid + "." + extension;

            printWriter.println("<script type='text/javascript'>"
                    + "window.parent.CKEDITOR.tools.callFunction("
                    + callback+",'"+ fileUrl+"','이미지를 업로드하였습니다.')"
                    +"</script>");

            printWriter.flush();

        } catch (IOException e) {
            e.printStackTrace();
        }finally {
            try {
                if(out != null) { out.close(); }
                if(printWriter != null) { printWriter.close(); }
            } catch(IOException e) { e.printStackTrace(); }
        }
    }
파일이름은 중복이 되지 않도록 UUID를 생성하여 이름을 바꾸어 주었습니다.
OutStream을 이용하여 저장공간에 이미지 파일들을 저장하고
PrinWriter를 이용하여 View에 띄어줄 구문을 작성합니다.
@Value의 uploadPath와 resourceHandler의 정보는 그리고 파일 경로에 대한 정보는 아래에서 설명하겠습니다.
4. 이미지 외부 경로 저장
저는 처음에 이미지 저장 경로를 D드라이브로 했다가 Not allowed to load local resource: 라는 에러 문구가 뜨며 접근 거부가 떳었는데, 이것은 해킹의 위험이 있어 브라우저에서 사용자의 시스템 드라이브에 접근하는 것을 막는 것입니다.
그렇기 때문에 저는 특정 URL에 접근하면 외부 경로에 있는 리소스에 접근할 수 있도록 설정을 했습니다.
@Configuration
public class WebConfig implements WebMvcConfigurer {

    @Value("${resource.handler}")
    private String resourceHandler;

    @Value("${resource.location}")
    private String resourceLocation;

    @Override
    public void addResourceHandlers(ResourceHandlerRegistry registry) {
        registry.addResourceHandler(resourceHandler)
                .addResourceLocations(resourceLocation);
    }

}
resourceHandler( /admin/post/image/ ) 로 시작하는 URL 요청일 경우
resourceLocation( D:/imgUpload/ )로 요청을 전달하도록 설정했습니다.
image.properties
resource.handler = /admin/post/image/**
resource.location = file:///D:/imgUpload/

image.upload.path = D:\\imgUpload
여기서 중요한 부분은 resource.handler에서 URL경로의 맨 뒤에 /** 를 반드시 붙어야 합니다.
추가적으로 설명을 드리면

fileUrl에서 실제 이미지의 경로는
file:///D:/imgUpload/ + uuid + "." +extension;
이렇게 되어야 하지만 /admin/post/image/로 바꾸어 줌으로써 브라우저에서 사진을 전송하고 화면에 사진이 띄어졌을 때 사진을 찾는 경로는 아래와 같이 될 것입니다.

/admin/post/image/ 의 경로는 위에서 설정한 것과 같이 D드라이브의 imgUpload 폴더에서 찾게 됩니다.
서버에 정상적으로 작동이 완료되면 이미지가 에디터에 적용되는 것을 확인할 수 있습니다.


'Spring Boot' 카테고리의 다른 글
| [Spring Boot] yml, properties 여러개 등록하기 (0) | 2021.11.18 |
|---|
